Motions of the Ocean Lesson Plan (4th and 5th Grades)
Climate Change, Tides, and Changing Seas
By: Anna Clabaugh1, Jasmine McAdams1, Sarah Spiegler2
(annarc@email.unc.edu, jasmine9@email.unc.edu, spieglers@gmail.com)
UNC-Institute of Marine Sciences1 and North Carolina Sentinel Site Cooperative2
Grade Level: 4-5
Subject: Earth and Environmental Science
Overview
This three-part lesson plan provides information about weather, climate, tides, and changing sea levels. The first part will differentiate between weather and climate, and changes in global and North Carolina temperatures. The second part will explain basic mechanisms driving tides in coastal North Carolina. The third part will discuss how high water events caused by rising seas and extreme tides can influence coastal communities. This lesson was inspired by the NC King Tides Project (http://nckingtides.web.unc.edu/), a citizen science project initiated to raise community awareness about the potential impacts of sea-level rise. The extension activity will explain how students can contribute to the NC King Tides Project as a classroom activity or on their own.
Goals
- Gain a stronger understanding of the difference between weather and climate.
- Gain a stronger understanding of changing local and global temperatures.
- Gain a stronger understanding of what influences tides and why we care about them.
- Make the connection between climate, sea-level rise, water level changes, and tides.
- Understand how changing water levels affect our coastal communities.
- Introduce the NC King Tides project to meet the transitioning standards of STEM to STEAM by using photography as a tool to better visualize the potential impacts of changing water levels and sea-level rise on our coastal communities.
Measurable Verbs
- Compare and contrast weather and climate
- Compare impacts of sea-level rise on coastal habitats and coastal communities
- Identify local vulnerabilities to sea-level rise
- Illustrate what sea-level rise would look like
- Differentiate between the influence of climate-driven sea-level rise and tidal changes
| Incorporated Standards | |||
|---|---|---|---|
| Grade Level | NC Essential Standards | NCES Clarifying Objective | Next Generation Science Standards |
| 4th | 4.L.1 Understand the effects of environmental changes, adaptations and behaviors that enable animals (including humans) to survive in changing habitats. | 4.L1.1 Give examples of changes in an organism’s environment that are beneficial to it and some that are harmful. | 4-ES S3-1 Obtain and combine information to describe that energy and fuels are derived from natural resources and their uses affect the environment |
| 4.L.1.3 Explain how humans can adapt their behavior to live in changing habitats | |||
| 4.G.1 Understand how human, environmental and technological factors affect the growth and development of North Carolina. | 4.G.1.2 Explain the impact that human activity has on the availability of natural resources in North Carolina. | 4-ES S3-2 Generate and compare multiple solutions to reduce the impacts of natural Earth processes on humans | |
| 5th | 5.E.1 Understand weather patterns and phenomena, making connections to the weather in a particular place and time. | 5.E.1.2 Predict upcoming weather events from weather data collected through observation and measurements. | 5-ES S3-1 Obtain and combine information about ways individual communities use science ideas to protect the Earth’s resources and environment. |
| 5.G.1 Understand how human activity has and continues to shape the United States. | 5.G.1.2 Explain the positive and negative effects of human activity on the physical environment of the United States, past and present. | 5-ES S2-2 Describe and graph the amounts and percentages of water and fresh water in various reservoirs to provide evidence about the distribution of water on Earth. |
Intro Activity
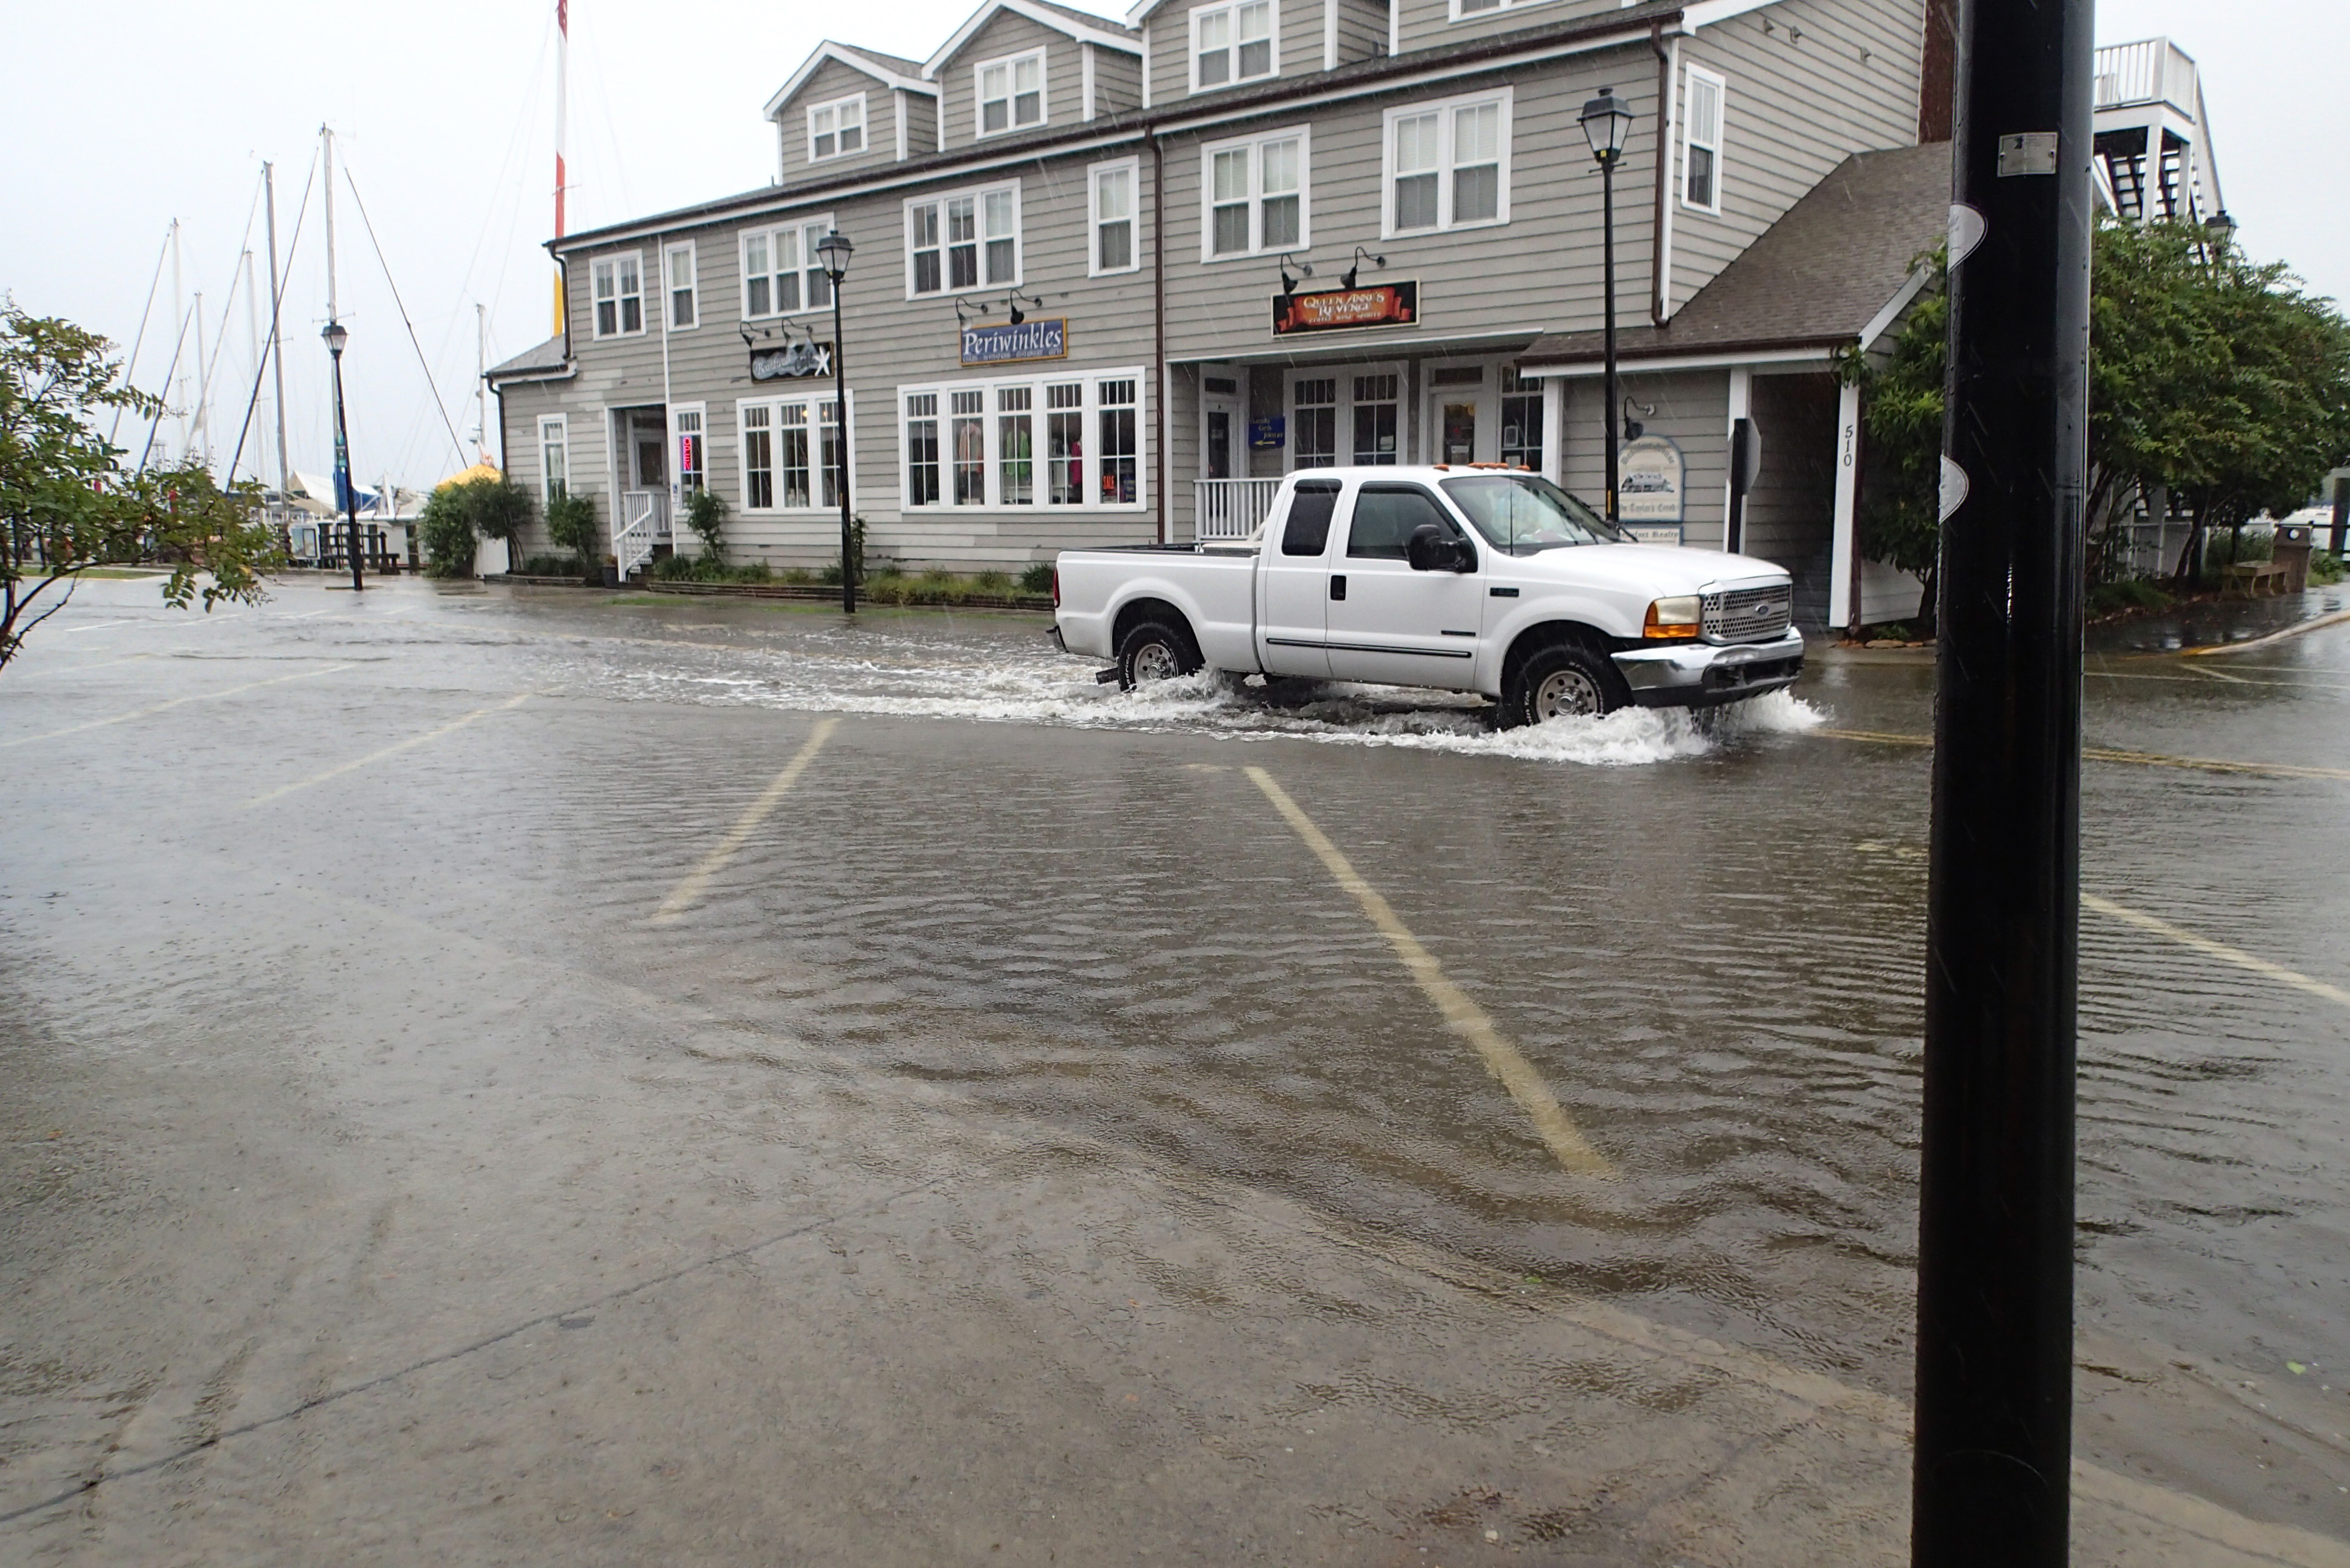
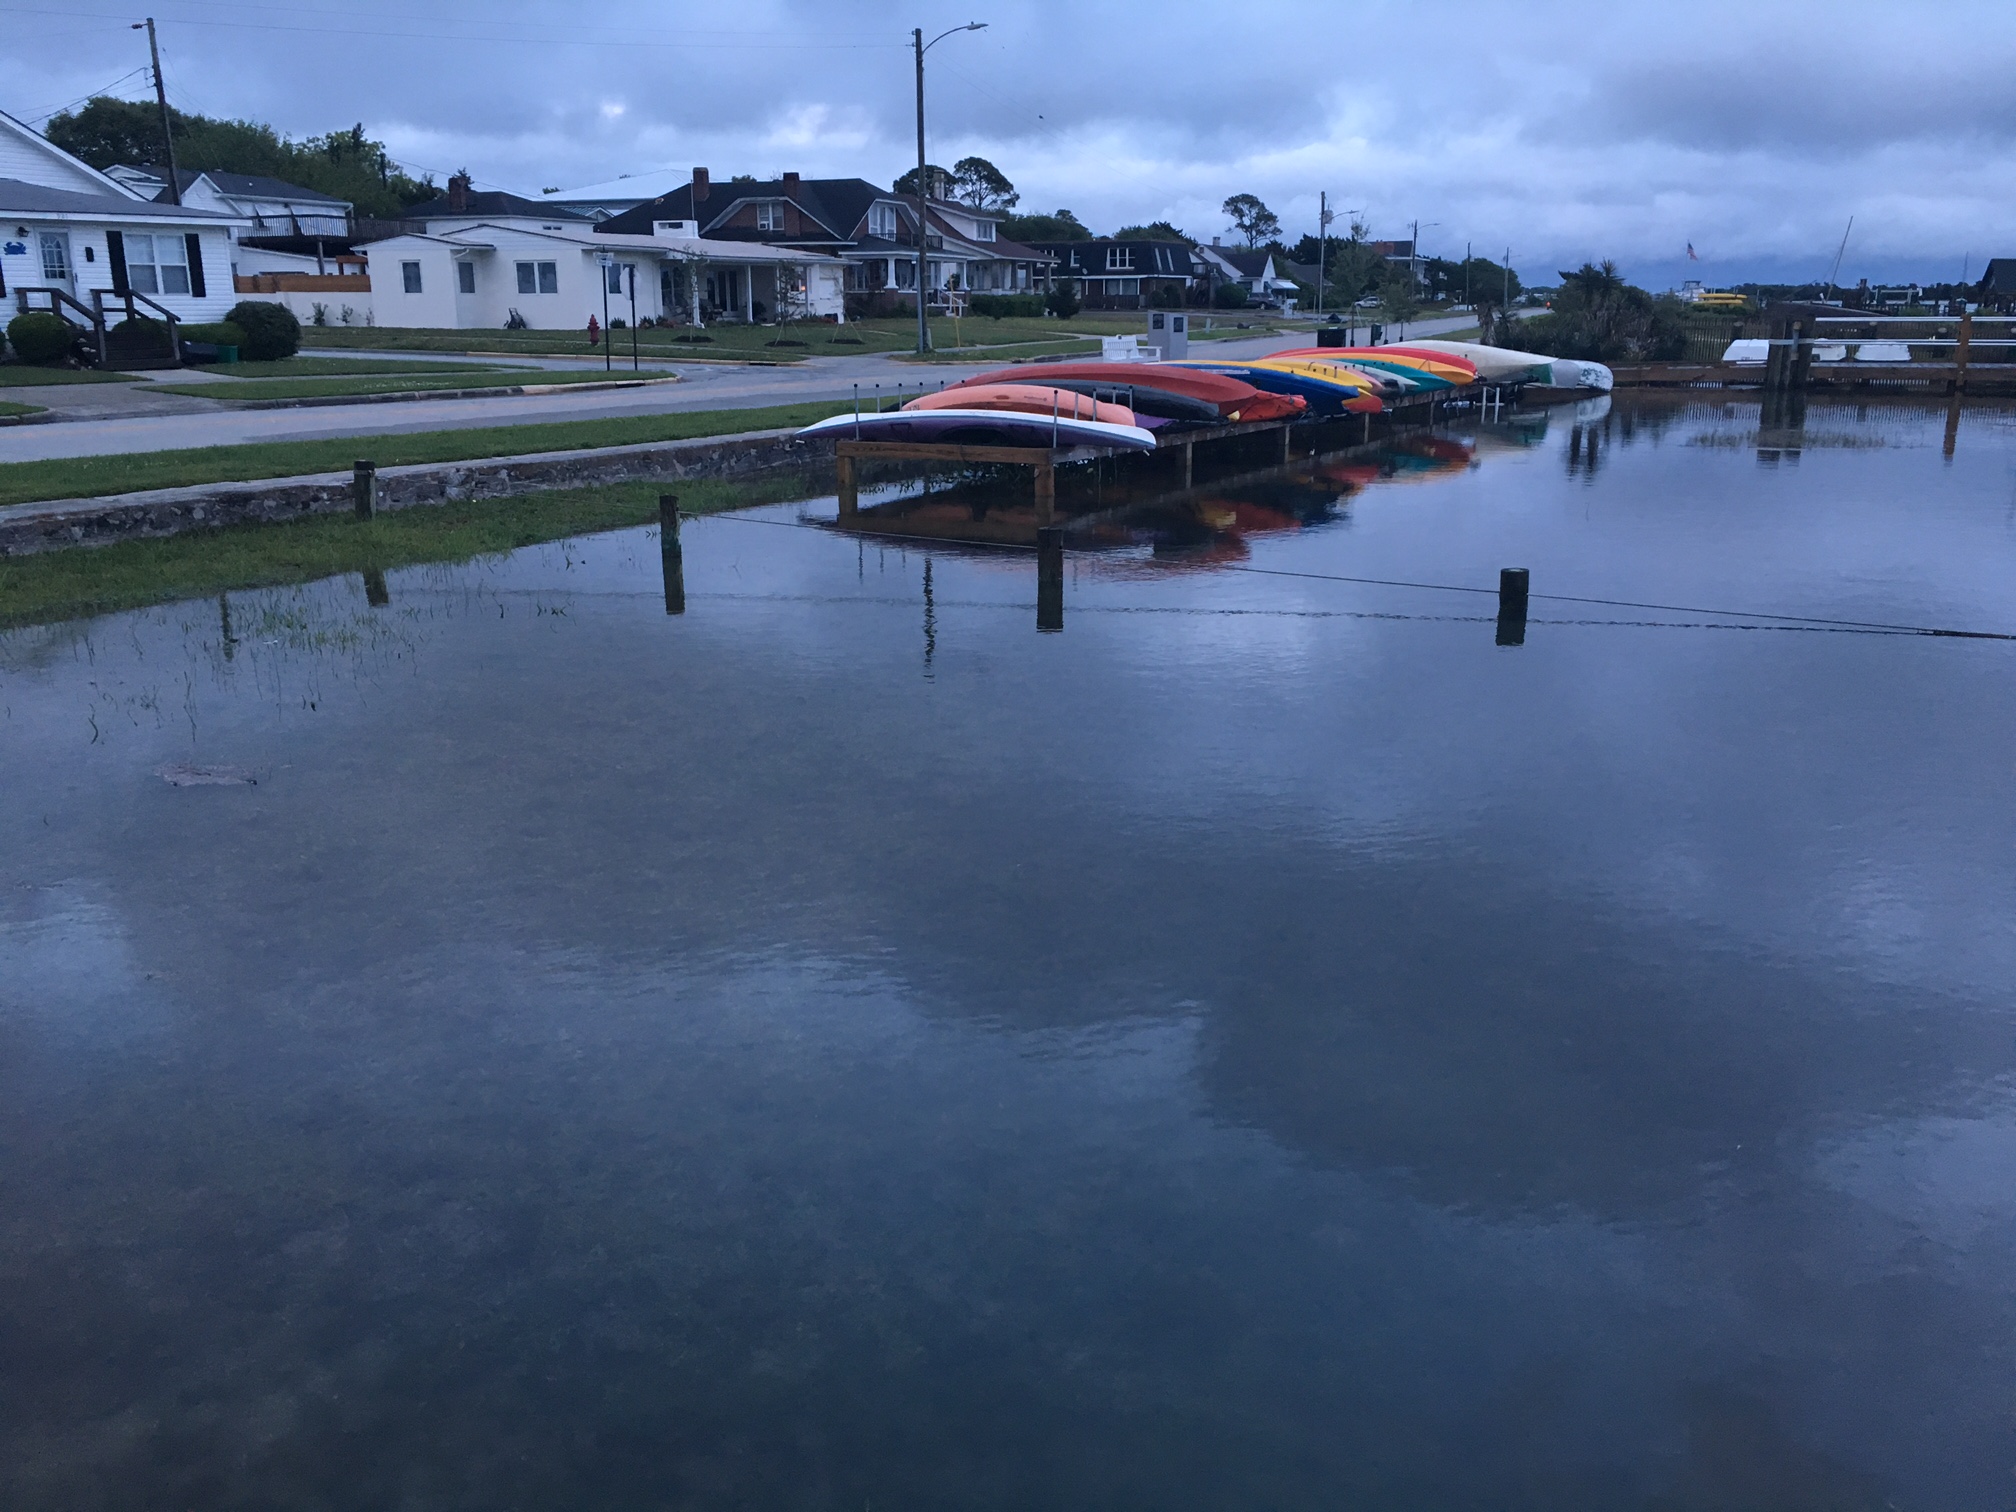
Display pictures (below) of flooding in Beaufort, North Carolina, or other available flooding pictures from your area. Lead a discussion about the pictures, which can include some of these questions:
- Do you know where this picture was taken?
- Have you ever seen flooding where you live?
- Have you ever driven, walked, or biked through flooded streets?
- Do you have any pictures at home of flooding in your neighborhood that you can bring into school to share?
- What are the dangers associated with these pictures?
Lesson 1: Weather and Climate, What is the Difference?
Focus/Overview
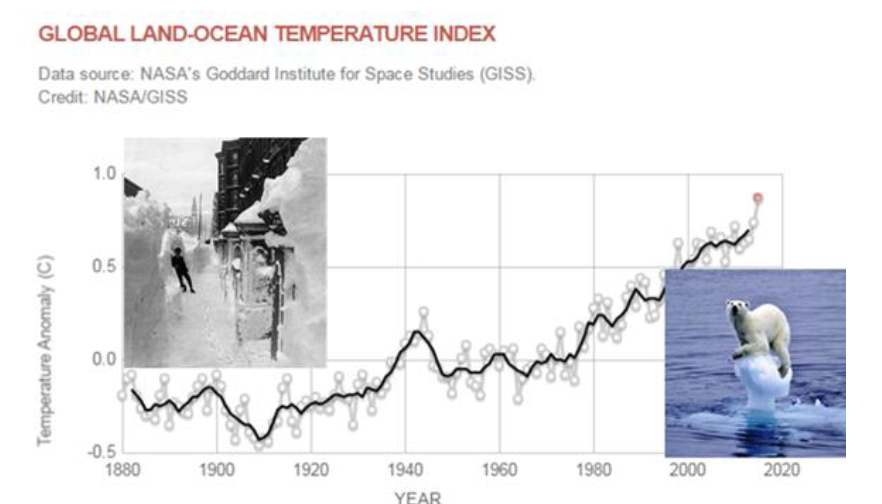
Students will collect weather data daily, graph these measurements, and compare the data they collect with longer-term climate data for their community. Weather is a specific event or condition that happens over a period of hours or days (local and temporary). Climate is average weather conditions in a place over many years, usually at least 30 years (long-term). Global climate change are patterns of change around the world over many years. The average temperature of the Earth has been increasing for many years. Rising global temperatures are leading to global changes; such as sea-level rise, stronger hurricanes, melting glaciers, and the loss of wildlife habitats.
Goals
- Collect data that shows that the weather in the student’s community naturally varies from day to day and year to year, and some years are hotter than others.
- Understand and explain that evidence of climate change is based on data collected and observed over a few decades or more.
Materials
- Thermometer to measure temperature outdoors. A copy of the EPA lesson plan entitled “Weather and Climate: What’s the Difference found.”
- Worksheets from EPA lesson plan
- “Daily Weather Data” worksheet: students will record daily weather data (temperature, clouds, wind, precipitation)
- “Weather vs. Climate Data Collection” worksheet: here students will record daily temperatures, and local average temperatures found on www.weather.com
- “Procedure for Measuring Daily Temperature”: describes how to measure daily temperature
- “Instructions for Getting Climate Data”: describes how to use www.weather.com to find local average temperatures for your community
- Graph Paper
- Pencils, colored pencils
- Computer, access to internet
Procedure
- Follow the procedures in the EPA lesson plan “Weather and Climate: What’s the Difference” to measure local weather, and collect long-term climate data for the student’s community.
- Use the local weather temperature measurements collected during the EPA lesson to discuss weather and regional climate in North Carolina.
- Utilize recent NOAA climate state summaries for North Carolina: https://statesummaries.ncics.org/nc
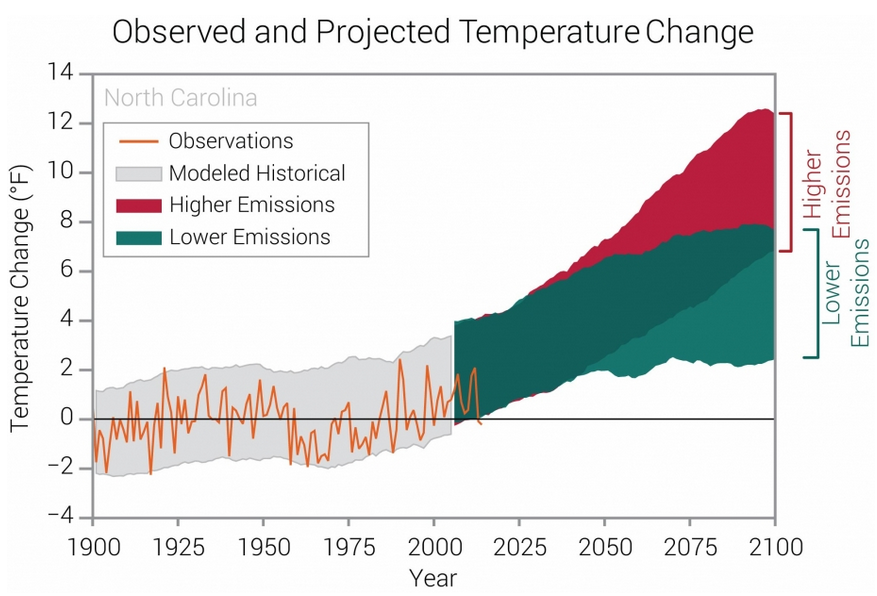
- Discuss figure 1 “Observed and Predicted Temperature Change” in North Carolina from the years 1900-2100 to discuss with students the impacts of climate change in North Carolina.
- Brainstorm a list of the potential impacts of global climate change to habitats, and what this means for plants and animals. See figure 2 to start the discussion.
Assessment
- Students will create graphs depicting local weather and climate data.
- Students will correctly identify the connections between temperature, weather, and climate.
- Students will explain that changing climate causes changes to habitats both globally and locally.
- Students will apply knowledge to discuss possible actions to decrease their carbon footprint.
- Monterey Bay Aquarium Video: Change for the Oceans—small actions can make a real difference: https://www.youtube.com/watch?v=hnh5PVMj8BU
- Ideas of actions to take to decrease carbon usage: http://www.montereybayaquarium.org/climate
- Brainstorm a list of actions with the students and post them in the classroom. Create a challenge or competition among students of completed individual actions, and/or actions by family members.
Additional Figures
Lesson 2: Tides
Focus/Overview
Discuss with the class that the moon has a strong gravitational pull on the Earth. Since water is fluid this gravitational pull can move water, particularly large bodies of water such as the oceans. This pull causes the water of the oceans to be pulled in one direction or another. When the water is pulled towards the coastline this causes a high tide, when it’s pulled away this causes a low tide. In addition, discuss how the sun’s gravitational pull can create spring and neap tides. Good discussion tool: http://www.mmscrusaders.com/newscirocks/tides/tideanim.htm
Goals
- Explain the difference between high and low tides and how they are created.
- Demonstrate how the moon and sun’s gravitational pull on the Earth creates tides.
Procedure
(Sourced from: http://mjksciteachingideas.com/pdf/TidesActivity.pdf)
- Circle up. Have the class form a circle in a large area. This could be in the classroom, gymnasium, on a lawn, or on the playground.
- Link-up. The ideal way for students to sit is crossed-legged with hands holding the next person’s elbows to form a strong circle. If the class is reluctant to touch, have them kneel “knock-kneed” next to each other in a circle.
- Simulate Moon’s orbit around the Earth. One person is the moon and moves around the outside of the circle. The circle is the waters of the earth. As the moon passes behind the students (water), the waters bulge (lean) toward the moon, and then into the center as the moon passes. As the moon moves, have the students that are opposite the moon lean away from the moon (this represents water bulging out on the opposite side of the earth) and then have them lean into the center as the moon passes.
- Observe the effect of the Moon. Have the moon stop, and let the class see where the high tides are (next to the moon and at the opposite side of the circle). Then the moon continues to circle. Have the moon stop at several points in the circle and let the class see where the high and low tides are in relation to the orbit of the moon. (Low tide will be at the sides halfway between the high tide bulges.)
- The moon can then circle the earth several times so the rhythm of the passing of the moon and the bulging of the waters is experienced by the class.
Lesson 3: Tides, Climate, and Sea-Level Rise
Focus/Overview
In this activity, students will create a coastal landscape model and examine the influence of tides, glacial melt, and sea-level rise on the coast. This activity can be adapted to involve different types of discussions and level of student engagement.
Goals
- Construct a simple model of coastal environments to understand the effects of melting glaciers and tides on land.
- Measure rate of “sea-level rise” in the model.
- Predict the types of changes that will occur in the modeled environment with sea-level rise.
Materials
- Water Level Model Worksheet
- A rectangular plastic container (preferably see through)
- Clay
- Wet floral foam
- Paper or plastic (game pieces) mini houses
- Printout of paper houses and people/animals
- Dry erase marker
- Ruler
- Tap water
- Ice
- Small bowl with wide, flat bottom
Procedure
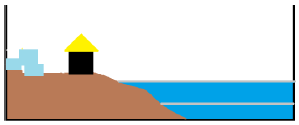
*See diagram below for help with setup
- Create the land. Place floral foam blocks along the short side of a plastic container. Cover the foam blocks with clay and shape the clay so that the land is sloped towards the center of the container.
- Create landscape. Stick buildings and figures on top of land to create a landscape.
- Optionally, involve students in this step to brainstorm and assess where buildings should be situated relative to the coastline and discuss why.
- Fill the ocean. Add water to the container until the water fills the container midway along the landmass.
- Using a ruler, have students record the water level and its distance to certain landmarks.
- Use the Water Level Model Worksheet and have students complete the pre-activity assignment.
- Demonstrate tides. Gently tilt the container from side the landward side, illustrating the “piling up” of water that occurs on one side of the container during a high tide event. Emphasize that this landward side of the container (or Earth) is experiencing a high tide due to the pull of the Moon, which is facing this side of the Earth. To help explain the phenomenon, it may be useful to draw the following diagram for students:
- Demonstrate effects of glacier melt. Add ice cubes “upland” at the top of your clay slope or alternatively on top of an upside-down bowl placed within the container – these will represent melting ice sheets such on Antarctica and Greenland.
- Explain that these ice cubes will represent glaciers and ice sheets, or land ice, rather than icebergs, or floating ice
- Observe changes in sea level as glaciers melt. Leave the ice to melt. After the ice melts, ask students to measure and record the new water level in the Water Level Model Worksheet.
- Discuss what impacts this might have on the coastal environment
- Observe a high tide with glacier melt. Again, lightly tilt the container to the landward side. What does the high tide look like now? How might high tides with a higher sea level look like?
- OPTIONAL: Demonstrate effects of storms on the coast. Create action in the container, by splashing water in the container towards the land. Doing this in different scenarios (high and low water, and high and low tide) can be used to further demonstrate coastline vulnerability to storm events.
Discuss and Assess
After discussion, have students complete the post-activity in the “water level model” worksheet.
- Do you think your community will be affected by sea-level rise? Why or why not?
- What are the factors that determine how significant a little bit of sea-level rise is?
- What issues might this cause for coastal residents? What about plants and animals?
- How might the shape of the land influence the amount of flooding?
- What actions can we take to help prevent these issues, or what adaptations will people need to make? (example solutions: building farther away from the coastline, creating vegetative buffers [i.e. marshes/living coastlines])
Extension Activity: NC King Tides Project – http://nckingtides.web.unc.edu/
Overview/Focus
The mission of the King Tides Project is to help people better understand the impacts of climate change on their local communities by looking at abnormally high tides. These King Tide events (extreme high tides that are caused by the gravitational pull of the moon) are frequently associated with flooding, especially when accompanied by a storm. While these events are completely natural, they can help us visualize and forecast what our coastal communities may look like with sea-level rise. Therefore, these King Tide events can help coastal planners and developers understand what actions we may need to take within our communities to prepare for the effects of sea-level rise. There are King Tides citizen science projects throughout the world and in many US states. In the fall of 2015, UNC Institute of Marine Sciences began the North Carolina King Tides project.
We are asking citizen scientists, like you, to go out and take pictures at certain times of the year when we are expecting high tide events. These photos need to include a vertically stable benchmark that we can later measure to collect data on how high the water level was during the high tide event. Students and their parents, or teachers and the class (this would make a great field trip activity), can use their cameras or smartphones to take the photos of high water events and then upload them to the Flickr group, King Tides NC.
You can find more information on our webpage, including a calendar of upcoming predicted King Tide and other high tide events: (http://nckingtides.web.unc.edu/)
Goals
- Collect data for the NC King Tides citizen science project using photography
- Recognize the influence of tidal forces and meteorological forces on local water level
- Synthesize earlier lesson material when exploring in your coastal community
Materials
- Cameras or smartphones
- GPS (if available)
- Ruler or measuring stick
- King Tides photo documentation worksheet
- Clipboard
- Pen
- Computers, access to internet
Procedure
- Send us a request! Create a Flickr account for your class, and join the King Tides NC group: https://www.flickr.com/groups/kingtidesnc/. We will approve your request so you can share your photos with us. We recommend doing this a few days before you intend to go out in the field.
- Provide examples. Prior to going in the field, show students examples of photos taken for the King Tides project (examples below, with more examples on the Flickr site https://www.flickr.com/groups/kingtidesnc/).
- What evidence is present in the photos that suggest high or low tide events?
- Why do you think these sites were chosen?
- What types of sites do we want to choose that represent water level change over time?
- Review procedure. Provide students with the King Tides photo documentation worksheet that they will take into the field.
- For each location where water level data is collected, students should fill out this descriptive information for input onto the Flickr site.
- At each site, a photo should be taken of a vertically stable benchmark with water level reflected. Use a measuring stick or ruler for reference, if possible. A dock or lamp post are good examples of vertically stable surfaces.
- Get in the field. When out in the field, identify locations where high or low tide can be examined. We are particularly interested in photos of public places, but are open to all locations! Remember, safety is the number one priority! Be aware of slippery surfaces, currents, and waves.
- Why might a particular location be a good place to observe tides over time?
- What might it look like if high tide conditions occurred more often in these locations?
- Send us your data! Have students log in to the class Flickr account and upload images to the King Tides NC group. Students should add the details they recorded on their King Tides photo documentation worksheet in the photo’s description. See the Flickr upload guide for more details.
- Copyright setting should be set to “Attribution – NonCommercial – ShareAlike” or “Attribution – Non-Commercial – NoDerivs”